
Over 1.45 billion people use Facebook every day. Facebook has become the reference point for what’s happening in the lives of our circle of friends as well as current events around the world. If you have not already been doing so, you should consider Facebook as a great place to grow your business by starting a private Facebook group. If done correctly, you can reap huge benefits from managing a private Facebook group, such as:
- Improved customer satisfaction
- Reduced refunds
- Increased retention in monthly memberships
- More sales generated by word-of-mouth recommendations
Once you create a private group, management and engagement of the Group includes (but is not limited to):
- Answering questions
- Providing support
- Bridging the gap between your clients and your business
For example, we use our own Official JVZoo.com Facebook Group to give our Users instant access to the JVZoo Team. They are able to ask questions, request support, connect and interact with their peers and provide feedback quickly and easily. We also use the group for important announcements concerning updates to the JVZoo platform, new features, and JVZoo User recognition. It is a centralized hub where our Affiliates and Sellers can get the inside scoop on what JVZoo is working on & receive quick assistance from more experienced Users & JVZoo team members.
According to Facebook’s Newsroom, over 1 billion people use Groups. More than 100 million people consider Groups to be the most important part of their user experience. Private Facebook Groups are a place for like-minded people to interact and for brands and businesses to cultivate a thriving community. Simple day to day interaction with your customers will organically lead to loyalty and trust within your tribe.
So, how do you create a private Facebook group? It’s pretty easy, but let’s go through the steps so you are sure to set it up correctly:
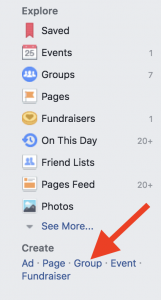
To begin, look at the bottom of the Left sidebar on your Facebook homepage… Click “Groups” under the section “Create.”
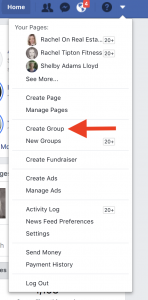
You can also create a group by going to the top of your home screen to the drop-down menu on your Right.
Next, choose a Name for your Group. You must also add or invite at least one person to your Group. Then, select the privacy setting you want (Public, Closed, or Secret).
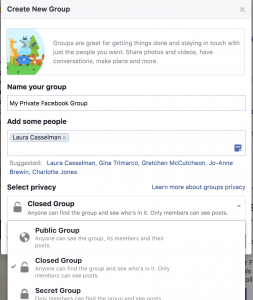
Here’s an overview of the differences between settings for your private Facebook Group:
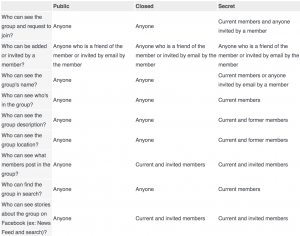
* Secret Groups are NOT searchable on Facebook. That means only the members of the Group can see what’s happening in the Group and who else is in the Group. The only way to join is by invite from a member or admin.
* Closed Groups might be a better option if you are planning to use your private Facebook Group to build a community. The Group will show up on the newsfeed as a suggestion, and the member list, title, and description are visible to anyone. Because a Closed Group will still require approval to join, you can create exclusivity and hopefully an incentive for like-minded members to join.
Once you have decided which privacy setting works best for your purposes, click “Create.”
You will be offered the option of selecting a fun icon for your Group, or just let Facebook add a generic one.
Congratulations! You have a new private Facebook Group!
Now, it’s time to fill out the information on your Group. Go over to the “More” tab below the cover photo of your Group and Click the 3 little dots. Select “Edit Group Settings.” There are all sorts of fun changes you can make to customize your Group.
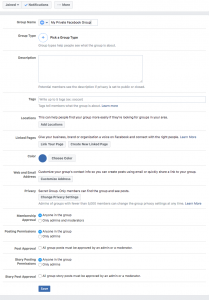
Here are some key things to include when customizing your private Facebook Group:
- Upload an eye-catching cover photo. Size should be 820 x 426 pixels.
- Select a Group type so that people know what your Group is all about.
- Write a description giving details about your group. You have 3000 characters. This is a good place to lay down some ground rules, do’s and don’ts, especially for newbies. Be clear on what members SHOULD do in the Group and what they SHOULD NOT do as far as acceptable behavior within the Group. (For example: No promoting products.)
- Add up to 5 tags to help people find your Group.
- Add your location (or multiple locations) to help people in your area to find you.
- Customize your URL with something easy to remember. You have up to 50 characters, but try to keep it short and sweet.
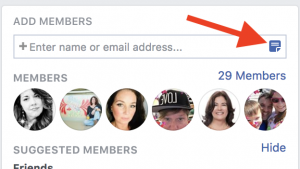
It’s time to add and invite friends to your private Facebook Group! If you know that a friend (or Team member) would absolutely want to be a part of your Group, then add them. Otherwise, it’s best to invite people and let them decide if they want to join. It is poor Facebook etiquette to add people to a Group without asking them first! On the Right side of your Group page, you will see “Add members.” You can add a personalized message explaining what the Group is all about when you invite someone. Simply Click the tiny blue icon.
Link your private Facebook Group to your Facebook Page so that your fans can find your Group. Here’s how you do it, depending on your settings. Once you do this, you can also post as your Page, rather than as yourself. This can be helpful as your Group grows and you add Admin members to help you manage the activity.
Boom! Your private Facebook Group is ready to rock!
Now, the real fun (and work) begins in generating engagement within your community. Building stronger relationships through interaction with your client, customer, and user base will enhance their loyalty to your brand and their decisions in doing business with you. There are a few things you need to do to keep your private Facebook Group active and healthy:
- Engage with your Group members regularly. At first, your members are not as likely to start conversations. So, you should instigate meaningful discussion and debate 2 or 3 times a week to try to get people involved. Perhaps you could welcome newbies on Mondays and ask them to introduce themselves. On Fridays, ask seasoned members to share their wins for the week. Create a calendar for yourself so that the posts become consistent. The most important thing of all is to comment on every post from your members and respond to every question. This will let your members know that you value them and you are there for them.
- Promote your Group. Think of growing your private Facebook Group in the same way you strive to grow your email list. In fact, ask people to join your Group when you ask them to join your email list. Send an invitation to your existing email list so they can join your Group. If you are looking for a large Group, then promote the heck out of it all over Facebook and your other social media channels. Once you gain momentum, word of mouth within your Group will help, but be proactive in doing your part in constantly building.
- Host events. These could be online OR offline in person. This is a great way to involve your members and perhaps attract new members. Set up a regular weekly Q&A. Invite members to be a part of a panel discussion. If you have a lot of local Group members, have a party or picnic to meet face-to-face. Human connections in person will always enhance online relationships! Note: Be sure to create an Event on Facebook to promote, even if it is a recurring weekly thing.
- Stick to your guidelines. As we mentioned above, it is a good idea to lay out the ground rules for your private Facebook Group in your description or add it as a pinned post. You may want to edit your settings so that you or your other admins can approve (or deny) posts before they are visible within the Group. If you do not restrict posts by members, be sure to delete any offensive or aggressive posts. When a member of the Group violates one of your rules, discuss it with them in a private message. Let them know exactly what they did to violate the Group rules. You may have to block or remove a Group member who breaks the rules multiple times. But, if you can work it out in a positive way, you may create an even stronger relationship!
A private Facebook Group can be a big hit if you manage it correctly and create a space that:
- Provides a safe space for people to ask questions
- Offers support
- Builds relationships with you, your company/brand, and other members of the Group.
Strive to connect with members, connect members with one another, and connect members with what you and your company can do to help them. A private Facebook Group can be a fun place to interact and people can get a little bit addicted if the atmosphere is right. Remember that if you make your Group a place where good things happen, your members want to keep coming back… and they may even bring some other Facebook friends.
Good luck and enjoy!
Looking for more help with your private Facebook Group? Check out these awesome JVZoo products: